My Suburban Kitchen

Delicious Recipes to Keep my Family of Four Happy and Full

  • Home
  • Food
    • Recipes
      • Appetizers
      • Breakfast
      • Casseroles
      • Crockpot
      • Desserts
      • Drinks
      • Main Dishes
      • Pasta
      • Salads
      • Sandwiches
      • Side Dishes
      • Snacks
      • Soups
      • Special Diet
        • Gluten Free
        • Paleo
        • Vegetarian
      • 5 Ingredients or Less
      • 30 Minutes or Less
    • Meal Plans
  • Holidays
    • Valentine’s Day
    • St. Patrick’s Day
    • Easter
    • July 4th
    • Halloween
    • Thanksgiving
    • New Year’s Eve
    • Christmas
  • Projects
    • Crafts
    • Decor
    • DIY
    • Pinworthy Projects
  • Work With Me
  • About
You are here: Home / Contributors / Contributor - DIY Projects / Up-cycled White Washed Picket Fence Backdrop

Up-cycled White Washed Picket Fence Backdrop

April 28, 2015 By Trina Miner 17 Comments

Pinterest


My husband is a pretty easy going guy. When I give him a list of things to fix or create or do for me around the house he is pretty agreeable about doing it.  I love that man.

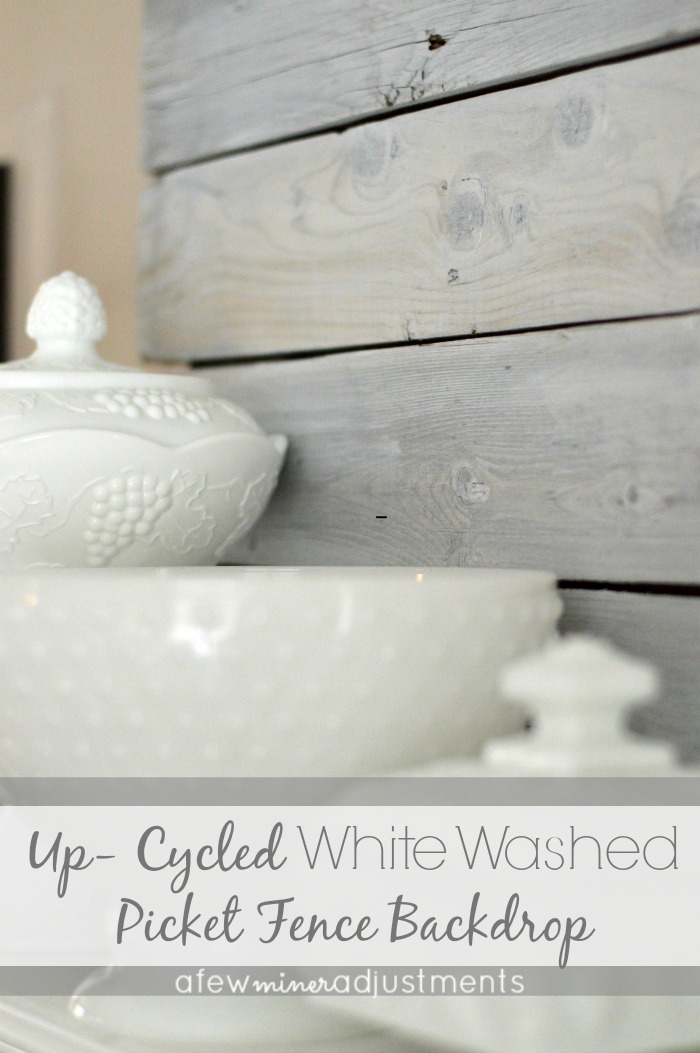
So when we took our picket fence down, I had a ton of ideas of what to do with the wood. 

And when I posted my February mantel here, I got a lot of emails about the backdrop. Funny, how so many people loved on it and my husband, although he gladly made it for me, very much disliked it.

OK….he hated it.

Oh boy, did I hear complaints about it. 

So here are the directions for making your own…just give them to your husband….or if he isn’t into it, make it yourself….it is so easy.
Picket fence Collage

You need:
wood planks, small nails, nail gun or hammer, wire, eye hooks

To Make:

Lay out your planks {I used 8 to fit my wall space}

Put another plank vertically on top and nail it to all the planks.  Do the same at the other end.

Screw Eye hooks into each vertical plank.

Twist wire onto the eye hooks

Once it was put together I white washed the planks….mix 1 part white paint and 1 part water…brush on and wipe off to your liking.

Hang and enjoy!

I also added a nail to the bottom corner, on the front, to hang a picture frame on it. 

backdrop

Now that I have had this hanging for awhile, my husband doesn’t complain about it anymore. It is even been rumored around here he now loves this hanging over our mantel. 

Hmm, what is next on my list for him?


Let’s be Friends: Facebook, Pinterest, Hometalk, Google+, Twitter, Tsu
 
backdrop 2 
sig

Filed Under: Contributor - DIY Projects, Crafts, DIY Tagged With: DIY Photo Backdrop, Photo Backdrops

« Tropical Guacamole
Mustard Balsamic Chicken Kabob Recipe »

Let's stay connected...

Never miss a recipe
Name: 
Your email address:*
Please wait...
Please enter all required fields Click to hide
Correct invalid entries Click to hide
No spam, ever. Promise. Powered by FeedBlitz

Never miss a recipe
Name: 
Your email address:*
Please wait...
Please enter all required fields Click to hide
Correct invalid entries Click to hide
No spam, ever. Promise. Powered by FeedBlitz


Comments

  1. Audra @ Renewed Projects says

    May 3, 2015 at 6:20 pm

    Simple, cute, and stunning!
    Audra @ Renewed Projects recently posted…Broken French Press Planter/VaseMy Profile

    Reply
    • Trina Miner says

      May 3, 2015 at 8:54 pm

      Thank you, Audra!

      Reply
  2. Kate Rigby (@mrsdiggerhound) says

    May 5, 2015 at 2:51 pm

    This is great. I have a hubby like that too. He’s just had to put up a new fence but we had a lot of spare off cuts of wood and now he has made a 3 tier plantar out of it and a storage bench for the shed. It looks really lovely.

    Reply
    • Trina Miner says

      May 5, 2015 at 4:24 pm

      Thanks, Kate! That is awesome that you created all of that from the left over wood. I would love a storage bench in my shed!

      Reply
  3. Kate Rigby (@mrsdiggerhound) says

    May 5, 2015 at 2:53 pm

    My last comment I attached the pinterest address by accident, Doh! ;D
    Kate Rigby (@mrsdiggerhound) recently posted…Yay! moment.My Profile

    Reply
  4. Meredith @ The Palette Muse says

    May 5, 2015 at 4:18 pm

    My husband has also been known to, um, strongly dislike some of my most creative projects. He usually comes around though. This is gorgeous, and I love how you hung that photo so asymmetrically! Pinning to my DIY Inspiration board.
    Meredith @ The Palette Muse recently posted…Why I Want My Children to Fail…SometimesMy Profile

    Reply
    • Trina Miner says

      May 5, 2015 at 4:28 pm

      Thank you, Meredith. I think our hubbies just need to get used to our super cool ideas. Men aren’t big on change, lol!

      Reply
  5. Travel Animal Doctor says

    May 6, 2015 at 6:02 am

    Wow. This is a really great idea. I like the way that you made your fence into a lasting memory to hang. It looks great with the picture on it.
    Travel Animal Doctor recently posted…Sopapilla CheesecakeMy Profile

    Reply
    • Trina Miner says

      May 6, 2015 at 7:06 am

      Thank you! I really appreciate it.

      Reply
  6. Ariel says

    May 6, 2015 at 5:43 pm

    Such a beautiful backdrop! Love that these are so easy to make too – I’ve made props for things to sit on, but nothing hung, so this will be something new to try! Thank you for the post! 🙂

    Reply
    • Trina @ afewmineradjustments says

      May 14, 2015 at 9:52 pm

      Thank you, Ariel!

      Reply
  7. Brittanie @Simplistically Living says

    May 10, 2015 at 2:01 am

    Great idea! It’d make a perfect backdrop for photographing images for my blog! Thanks for sharing at the #HomeMattersParty. We hope to see you again next week.
    Brittanie @Simplistically Living recently posted…Soothe Your Baby to Sleep with Tiny Love Soothe ‘n Groove MobileMy Profile

    Reply
    • Trina Miner says

      May 10, 2015 at 9:08 pm

      Thank you! I have used it as a backdrop too.

      Reply
  8. Marilyn says

    May 13, 2015 at 12:15 pm

    This back drop ROCKS…no matter what your wonderful hubby says! 😉
    We featured you at the Project Stash. Stop by tonight and pick up your featured button…you’ve earned it! 😀
    Marilyn recently posted…5 Colorful Crafts for May & The Project StashMy Profile

    Reply
    • Trina @ afewmineradjustments says

      May 14, 2015 at 9:53 pm

      Thanks for the feature!

      Reply

Trackbacks

  1. 5 Springtime DIY Life Hacks + The Project Stash says:
    May 13, 2015 at 8:00 pm

    […] Paint Dipped Milk Bottles ~ A Worthey Read, Funny Face Seedlings ~ Made With Happy, Up-Cycled White Wash Backdrop ~ Just Us Four, DIY Seed Bombs ~ Hello Nature, Button Organization ~ Vintage […]

    Reply
  2. 5 Springtime Life Hacks ~ The Project Stash Link Party - Seven Alive says:
    May 13, 2015 at 9:01 pm

    […] Paint Dipped Milk Bottles ~ A Worthey Read, Funny Face Seedlings ~ Made With Happy, Up-Cycled White Wash Backdrop ~ Just Us Four, DIY Seed Bombs ~ Hello Nature, Button Organization  ~ Vintage […]

    Reply

Leave a Reply Cancel reply

Your email address will not be published. Required fields are marked *

Recipe Rating


CommentLuv badgeShow more posts

This site uses Akismet to reduce spam. Learn how your comment data is processed.

  • Bloglovin
  • Email
  • Facebook
  • Instagram
  • Pinterest
  • Twitter

About Me

Hi, I'm Shannah! Welcome to My Suburban Kitchen, where you'll find tons of recipe ideas including family friendly dinners, sinfully delicious desserts and even Paleo and Whole30 recipes. I love spending time in our kitchen and also share little glimpses of my life as a wife to one awesome Mathlete and working mom to 2 cute kids! I hope you'll grab a seat at our table and enjoy your time in the kitchen with us.

Search the Past

Visit Our Sponsors

Copyright © 2023 · My Suburban Kitchen