My Suburban Kitchen

Delicious Recipes to Keep my Family of Four Happy and Full

  • Home
  • Food
    • Recipes
      • Appetizers
      • Breakfast
      • Casseroles
      • Crockpot
      • Desserts
      • Drinks
      • Main Dishes
      • Pasta
      • Salads
      • Sandwiches
      • Side Dishes
      • Snacks
      • Soups
      • Special Diet
        • Gluten Free
        • Paleo
        • Vegetarian
      • 5 Ingredients or Less
      • 30 Minutes or Less
    • Meal Plans
  • Holidays
    • Valentine’s Day
    • St. Patrick’s Day
    • Easter
    • July 4th
    • Halloween
    • Thanksgiving
    • New Year’s Eve
    • Christmas
  • Projects
    • Crafts
    • Decor
    • DIY
    • Pinworthy Projects
  • Work With Me
  • About

Guest Blogger: Coffee Filter Christmas Tree Garland

December 11, 2013 By Shannah Coe 4 Comments

Happy Holidays, everyone! I’m Consie and I blog over at Atop Serenity Hill about face and body painting, cake decorating, photography and anything else that comes along on my creative journey. I am excited to be here today (thanks, Shannah!) to share my coffee filter Christmas tree garland with you!Coffee filter Christmas tree garland • AtopSerenityHill.com #Christmascrafts #easycrafts #Christmas

…

Read More »

Filed Under: Christmas, Crafts, Guest Posting, holidays Tagged With: Christmas, Christmas crafts, garland, Guest Posters, Guest Posting

20 Crafty Days of Halloween

October 17, 2013 By Shannah Coe Leave a Comment

Happy Thursday!  After you are done checking out my Fall Porch Tour this morning, please be sure to come visit me over at See Vanessa Craft where I am part of the 20 Crafty Days of Halloween.

20 Crafty Days of Halloween

Filed Under: Blog Hop, Crafts, decorating, Halloween, holidays Tagged With: Crafts, Guest Posting, halloween

{Guest Post} Quinoa Salad with Sesame Lime Dressing

August 14, 2013 By Shannah 6 Comments

Are you ready for the perfect summer lunch?  The two amazing ladies from Fry Sauce and Grits are here to give it to you!  Read on and then get ready to make your grocery list!
****************************************************
Hello this is Melanie and Courtney from Fry Sauce and Grits!  We’re so excited and grateful to be guest posting today on Just Us Four today!  Shannah is a creative goddess, so this is pretty much a big deal for us.    

…

Read More »

Filed Under: Cooking, food, Recipes, Salads Tagged With: Guest Posting, Recipes, salads, Side dishes

{Guest Post} One Pan Potatoes and Pepper Steak

August 5, 2013 By Shannah 2 Comments

Hello all! I’m Plucky from Plucky’s Second Thought…but most call me Jess. 🙂 Why “Plucky” you may ask? Well, it was a nickname when I was younger and it was one that was never forgotten! At Plucky’s Second Thought I try to post easy craft projects and recipes that anyone could accomplish. Yep, you don’t have to be Martha Stewart or Rachael Ray to attempt anything on my blog! There are also a variety of travel and product reviews as well as some awesome giveaways and link parties! 🙂


I’m here to share a recent recipe we tried that was amazing! I’m not one that tends to like beef dishes, but the ingredients in this dish allowed the beef to be super tender, flavorful, and delicious! Not to mention that it was SUPER easy to make!! 🙂

ENJOY!

One_Pan_Potatoes_and_Pepper_Steak

…

Read More »

Filed Under: Cooking, food, Guest Posting Tagged With: #monthoff, Guest Posting, Recipes

{Guest Post} Lucky Mugs from Lemon Tree Dwelling

February 7, 2013 By Shannah 2 Comments

Hi there! Isn’t this birthday extravaganza awesome? I hope you have enjoyed all the awesome posts so far this week!

Today, Cathy from Lemon Tree Dwelling is here to share a great idea for St. Patrick’s Day! Enjoy!
*********************************************************

Hi! My name is Cathy and I am so excited to be guest posting for Shannah today at Just Us Four! With the Superbowl behind us, and Valentine’s Day just around the corner, I thought maybe we could get a head start on some St. Patrick’s Day gifts. These are easy & inexpensive, and they make the perfect personalized gift from you or your kiddos to someone you love!

Lucky mugs. Actually, I tend to think that all mugs are lucky. I can recall numerous times in my life when the ONLY thing that got me out of bed was the promise of a strong cup of coffee (or three!!) Like every time I’ve had a newborn…or anytime I’ve had a kid who was up sick in the middle of the night…or how about the year we moved into a fixer-upper when I was 7 months pregnant…..!? Yep, at times like these, a warm mug in my hands makes me feel like the luckiest girl in the world. 

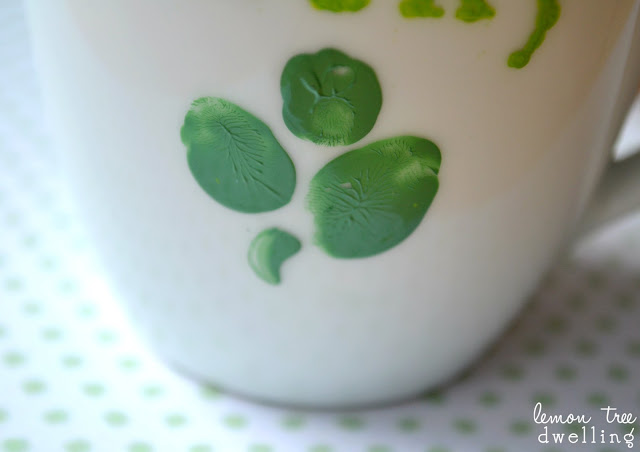
See, I think luck is about so much more than winning the lottery or making it big. I think luck is about all the small things that get us out of bed in the morning! Like our family, our friends, our work, our hobbies, our passions…. and, in a very literal sense (mine pull me out of bed every single morning), our kids! Which is why I love the idea of theseLucky Mugs with fingerprint shamrocks – the perfect daily reminder of just how lucky we really are (an especially helpful reminder when you have just been woken up 5 times in one night…!)

Here’s what you will need:

  • white mug (I found mine at Goodwill)
  • flexible alphabet stencils
  • small paintbrush
  • bakeable glass paint (dishwasher safe)  

 
Directions:
1. Wash & dry mug, then wipe area to be painted with alcohol. Let dry completely.
2. Use fingerprints to make shamrock (I made 3 leaves – one for each of my kids) and use a paintbrush to make a stem.
3. Let shamrock dry completely.
4. Using stencils and a small paintbrush, paint “lucky” or any word of your choice, one letter at a time. It works well to tape the edges of the stencil onto the mug to hold it in place.
5. Let paint dry completely between letters.
6. Once all the paint has been applied and dried, use a toothpick to scrape away any imperfections.
7. Follow baking directions on paint bottle.     

As you can see, my mug is still far from perfect. There is too much paint here, not enough paint there….. But I actually kind of like it that way. It’s kind of like life – imperfect, but lucky nonetheless 🙂

  ******************************************************************

Thanks so much Cathy!  Be sure to go visit Lemon Tree Dwelling to see the other amazing stuff Cathy has to share!
 

Filed Under: Crafts, Guest Posting, holidays, St. Patrick's Day Tagged With: Birthday Extravaganza, Crafts, Guest Posting, Holidays, St. Patricks Day

{Guest Post} Red Pepper, Bacon and Onion Tart from A Little Claireification

February 6, 2013 By Shannah 3 Comments

Happy Wednesday! Today, Claire, from A Little Clairefication is taking over and sharing an awesome recipe with you!
****************************************************************

Red Pepper & Bacon Tart with ALittleClaireification.com #redpeppertart #recipe #food

And that’s a WHOLE lot of love, right??

Hi, it’s me Claire and I blog over at A Little CLAIREification! I am just SO super excited to be guest posting here today at Just Us Four! What a treat, thanks Shannah! You can find out a little bit more about me here.

But for now what you should know is that, in my world… everything tastes better with BACON! 🙂 Ohhhh ok, ok. I don’t eat bacon that much – a couple of times a month, maybe – but I sure do love it! And for any of you vegetarians out there, you can substitute extra red peppers or maybe whatever veggie-meat product you prefer in this recipe. I present my Red Pepper, Bacon & Onion Tart – Valentine’s style!

I just adore making (and eating! ) tarts! They are super simple and the possibilities are endless! So many ingredients, so little time. Since we’re making a savory tart today I am going to use my standby tart dough recipe for a basic “Pâte Brisée”. Sounds fancy, huh? Nahh. It’s super simple (and inexpensive!) and the more you make it, the more you will get used to working with homemade tart dough and wonder why you never did it before!

So for the tart dough, the most important thing to remember is to keep it cold! Those little chunks of chilled butter are what makes for a very flaky crust.

The only ingredients in the dough?

  • 1 1/4 cups flour
  • 1 stick cold butter (I freeze mine to make it super cold), chopped into small cubes
  • 1 tsp. of salt
  • 1/8 cup of ice water

Process the first three in a food processor adding the water very slowly in a stream until the dough forms pea size crumbles and just barely starts to come together. You definitely don’t want to over mix! You may need to add a few more drops of water but once you knead it, the butter will add some moisture too. It will look crumbly but this is normal. Pile the dough mixture onto a floured surface and gently knead together until just formed into a round disc. Wrap the dough tightly with plastic wrap and chill in the refrigerator.

Preheat the oven to 400*.

I love fresh ingredients!! We actually grew these red peppers in our container garden on our patio! Now I just need a pet chicken. I hear the City frowns on that, though… (and I am sure my cat would be less than amused). 😉

Fresh Ingredients

For the filling:

  • 6-7 slices of bacon, crispy and crumbled into pieces (save the drippings!)
  • 1/2 large onion, diced
  • 1 large red pepper, diced
  • 3 eggs
  • 1 cup half and half (or a split combination of milk and heavy cream)
  • Pinch of nutmeg
  • 1/2 tsp each, salt & pepper
  • 1 cup shredded cheddar cheese

When cooking the bacon, I saved the drippings in the pan. When ready, I reheated the pan on medium heat, and added in the diced onion, letting it cook down for about 5 minutes or so.

Red Pepper & Bacon Tart with ALittleClaireification.com #redpeppertart #recipe #food

I then added the diced red pepper, stirring occasionally for about 10 minutes. A little steam on my camera lens!

Onions and peppers cooking

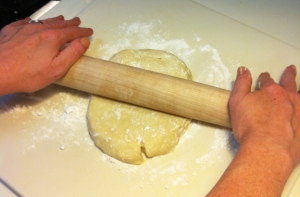
While those cooked, I pulled out the dough round and rolled it out on a lightly floured surface to about 1/4 inch thick.

I used a round tart form for this one but whatever shape you have would work. You can buy tart forms at a cooking store (like Williams Sonoma) or a large home goods store (like Bed Bath & Beyond). They are so handy I have several shapes and use them for both sweet and savory dishes.

Lay the dough into the form and press it down around the edges. It’s ok to take pieces and press them into any gaps along the sides – no worries. These tart pans are very forgiving!

Red Pepper & Bacon Tart with ALittleClaireification.com #redpeppertart #recipe #food


Place the tart dough in the oven to set up for about 10 minutes. Don’t forget it – set a timer!! You can use pie weights in the middle if you want – since it was only 10 minutes, I just patted the “puffy” middle down by hand because that’s how I roll. 😉

In the meanwhile, remove the onions and peppers from the heat and set aside.

In a medium sized bowl, combine the eggs, milk (or heavy cream mixture), nutmeg, salt and pepper and whisk until combined.

Remove the “par-baked” tart from the oven and spread the onion and red pepper mixture across the bottom of the tart. Follow with a layer of crumbled bacon. Lastly, a layer of cheese… YUM. I used a triple cheddar combo. You can pretty much use your favorite cheese though!

Red Pepper & Bacon Tart with ALittleClaireification.com #redpeppertart #recipe #food

Carefully pour the egg mixture over the tart until just below the top of the crust. I got a little “precious” and laid in a heart shape with some of the diced red peppers. 🙂

Red Pepper & Bacon Tart with ALittleClaireification.com #redpeppertart #recipe #food

Gently place the tart back into the oven (and place a baking sheet below it to catch any drippings!) for about 20 minutes checking it often after 15 minutes or so. Once the egg filling is firm, it’s all done! I added more crumbled bacon into the middle of the heart because.. well more bacon! Yeah!!

Red Pepper & Bacon Tart with ALittleClaireification.com #redpeppertart #recipe #food

Although, in hindsight, I could have left it in for another 5 minutes or so to brown up the crust even more. Ahh, we’re all just home cooks, right?? After about 10 minutes or so, I carefully removed he tart from the form. Hot stuff!!

Red Pepper & Bacon Tart with ALittleClaireification.com #redpeppertart #recipe #food

Since every single member of my family converged upon this and completely devoured the entire thing I’m lucky even got “after” pictures, let alone a piece for myself!

Red Pepper & Bacon Tart with ALittleClaireification.com #redpeppertart #recipe #food


Now how sweet is THAT to serve up for a little Valentine’s breakfast in bed??

Yep, you had me at bacon. 😉

It’s been such a pleasure posting here today! I sure hope you’ll stop by and visit sometime!

xoxo,

Claire

Filed Under: food, Guest Posting Tagged With: Birthday Extravaganza, grow your blog, Guest Posting, Recipes

{Guest Post} Tarte Au Citron from With a Blast

February 5, 2013 By Shannah 5 Comments

The birthday extravaganza continues! This afternoon, welcome Linda from With a Blast!  Thanks so much Linda for being here!
*********************************************************

Hi there to all Shannah’s readers !
My name is Linda and I blog over at With A Blast . I live in South-Africa and every now and then I will share one of our country’s traditional dishes as well as a whole lot of other recipes, some my own, others from all over the world. I also like to try my hand at all kinds of Crafts – feel free to drop in at any time.
I would like to thank Shannah for the opportunity to share a recipe on Just Us Four . Shannah, have a great time during your birthday week !
The recipe I am sharing today is a shortcrust pastry case filled with a citrussy, creamy custard.

Tarte Au Citron

PASTRY CASE:
1 Roll Frozen Shortcrust Pastry, defrosted
1 Egg, beaten
FILLING:
4 Extra-Large Eggs
1 1/2 cups Caster Sugar
150ml Fresh Cream  {double cream}
2 Limes, juice and finely grated zest
1 Lemon, juice and finely grated zest
Icing Sugar
TO SERVE:
Orange slices
Whipped Cream
Mint sprigs, to garnish
1.) Pre-heat your oven to 190 deg C (375 deg F) – Spray a 20cm (8 inch) pie dish with cooking Oil.
2.) Roll out the Pastry to about half it’s original thickness – line the pie dish, leave a 1cm (1/2 inch) edge above the dish. Prick the base a few times using a fork – line the Pastry with baking paper and fill with baking beans. Chill the Pastry case in the refrigerator for 15 minutes – remove and bake blind 15 minutes, remove from oven, scoop out the baking beans and paper – Brush the inside of the Pastry with the beaten Egg and return to the oven – bake another 5 minutes until pale golden.
3.) Remove the baked case and reduce the oven temperature to 150 deg C (300 deg F).
4.) To prepare the filling – beat together the Eggs and Caster Sugar until creamy – Stir in the Cream, Lime- and Lemon juice and zests – pour the filling into the baked Pastry case.
5.) Carefully place in the oven and bake 30 – 40 minutes until just set.
6.) Remove from oven and cool completely before chilling.
Before serving, dust a thick layer of Icing Sugar over the tart – Serve with a slice or two of Orange and Whipped Cream, add a Mint sprig to garnish.
Hope you enjoy this very refreshing citrus tart.
Linda

With A Blast

 ***************************************************
This looks so good! Thanks so much for being here today, Linda!

Filed Under: Cooking, Guest Posting Tagged With: cooking, Dessert, Guest Posting, Recipes

{Guest Post} Sloppy Joes from Plucky’s Second Thought

February 5, 2013 By Shannah

Welcome to my birthday week guest posting extravaganza. Today, we have an awesome recipe from Jess who blogs over at Plucky’s Second Thought.

*************************************************************

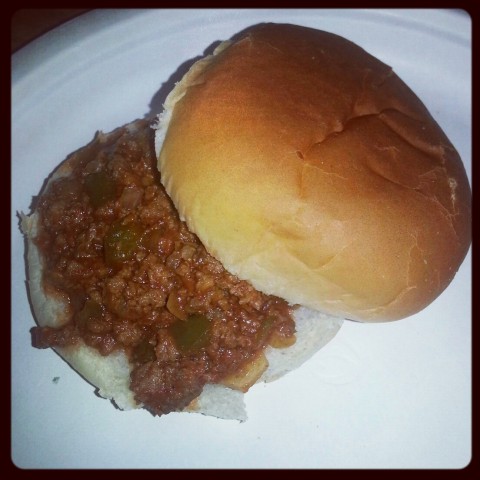
Hello all! I’m Jess from Plucky’s Second Thought! At Plucky’s Second Thought I try to post really easy crafts and recipes that anyone could complete and accomplish. Yep, you don’t have to be Martha Stewart or Rachael Ray to attempt anything on my blog! I was asked to Guest Blog on Shannah’s Blog to help her out, and I couldn’t say no because I was really excited to share my Homemade Sloppy Joe recipe! 🙂
What’s the best thing about this recipe?  You know everything that is going into this dish!  There are NO hidden ingredients/chemicals that you tend to find in store bought Sloppy Joe sauces!
Please enjoy this delicious recipe, and I’m sure it’s going to become your family’s favorite like it has mine! 🙂
Ingredients:
• olive oil
• 1 yellow onion, diced
• 1 green bell pepper, diced
• 1 and 1/4 lbs ground beef
• 1 and 1/3 c ketchup
• 2 tbsp white vinegar
• 1 heaping tbsp brown sugar
• 1 tsp chile powder
• 1 tsp paprika
• 1 tsp salt
• 1/4 tsp black pepper
• 2/3 c water
• hamburger bun

Directions:
• In a large skillet sauté onion and pepper in olive oil over medium-low heat.
• Once tender, remove from skillet.
• Then brown beef over medium heat; drain grease.
• Add sautéed vegetables back in pan along with ketchup, vinegar, brown sugar, spices, salt, pepper, and water.
• Bring to a simmer and cook about 20 minutes or until water is absorbed, stirring often.
• Serve on hamburger buns.
source: http://www.cinnamonspiceandeverythingnice.com/easy-sloppy-joes/

Filed Under: Cooking, food, Guest Posting Tagged With: Birthday Extravaganza, cooking, Guest Posting, Recipes

{Guest Post} Valentine’s Day Pancakes from Ang at Juggling Act Mama

February 4, 2013 By Shannah 1 Comment

Welcome to the birthday extravaganza!

Each year, I like to take my birthday week off to relax and enjoy some down time. In place of reading stuff from me each day, I feature a bunch of awesome bloggers and their projects/recipes!

Today, opening up our week of awesomeness, is Ang from Juggling Act Mama! She is sharing some delicious looking pancakes that are perfect for the upcoming holiday!
*************************************************************

Hi, I’m Ang (as in, short for Angela). I’m a mother, wife, daughter, sister, auntie, and friend, attempting to do it all – because, well, I want to (and I’m a bit of a nut!). I’m also a writer, crafter, scrapbooker, amateur photographer and Pinterest addict. Long before Pinterest, I developed addictions to books, snapping memories of my kids, and chocolate desserts… or chocolate anything…or…ok, just sweets in general – don’t judge me! I love being creative.

I’m married to my best friend and high school love (we’ve been together for more than half my life now, and married for 8 years). He’s a very supportive albeit, handsome dorky guy – (though I can’t complain since I have live-in tech support!)  He can also make me crazy, and I’m not talking about the good crazy: I’m a multi-tasker that swears by lists; he’s a realist that detests them.
We have two beautiful children – ok, I’m biased, but who isn’t when it comes to their kids, right? Our sweet, silly, smart son, Ethan, is four, and our darling, dimpled, diva daughter Olivia (Livi) is one.
I am the proud owner of an Etsy shop called AngelFlowers, where I sell some of my handmade hair accessories. Oh, and I also work full time at an awesome start-up, as an office manager, (this company has the potential to rock peoples worlds, in ways no one has imagined before).  So maybe I have my hands a little full… but don’t we all?
 
Visit My Blog
Facebook
Twitter
Pinterest
BlogLovin
Google+
 
I’m excited to be here to share with you a special way to say I love you to everyone in your family this Valentine’s Day with a ‘heart-felt’ pancake breakfast. (So corny, but I couldn’t help myself!) These pink and white pancakes are so easy to make, so here’s how to do it.
 
 
Start with your favorite pancake mix.  I love these Fluffy Pancakes, which are light and delicious, and perfect for cutting shapes out of them.  
 
Simply mix up your batter, then divide it into two bowls.  In one bowl, add red food coloring to get the color pink or red you want.
 
Next, fry your pancakes just as you normally would, taking care to make an equal number of regular and colored pancakes.
 
Carefully cut the heart-shapes out of the pancakes using a cookie cutter.  Next, remove the heart cut outs and put the white one into the colored pancake, and the colored one into the white pancake.
 
For an extra special treat, sprinkle in some mini chocolate chips, fresh raspberries, or serve these with a quick Strawberry Sauce.
 
These pancakes are sure to put a smile on your valentine’s face!
 
I hope you’ll come visit me for more creative recipes and fun activities to celebrate Valentine’s Day.


**************************************************
Thanks so much for sharing this great idea Ang!

Be sure to go visit Ang over on her blog, Juggling Act Mama!

Filed Under: Breakfast, food, Guest Posting, holidays, Recipes, Valentine's Day Tagged With: Birthday Extravaganza, Food, Guest Posting, Holidays, Recipes, Valentine's Day

I’m Traveling Today

December 18, 2012 By Shannah Leave a Comment

Hey guys!  Happy Tuesday!  Can you believe Christmas is just a week away???? Crazy, I know.

Just a little note to let you know that I am guest posting over at Salt Tree today to share my striped winter sleigh.

I hope you will come by to check out all the details on making this fun decoration that will last all winter!


Filed Under: Guest Posting Tagged With: Christmas, Christmas Decorations, Crafts, Guest Posting

  • Bloglovin
  • Email
  • Facebook
  • Instagram
  • Pinterest
  • Twitter

About Me

Hi, I'm Shannah! Welcome to My Suburban Kitchen, where you'll find tons of recipe ideas including family friendly dinners, sinfully delicious desserts and even Paleo and Whole30 recipes. I love spending time in our kitchen and also share little glimpses of my life as a wife to one awesome Mathlete and working mom to 2 cute kids! I hope you'll grab a seat at our table and enjoy your time in the kitchen with us.

Search the Past

Visit Our Sponsors

Copyright © 2023 · My Suburban Kitchen