My Suburban Kitchen

Delicious Recipes to Keep my Family of Four Happy and Full

  • Home
  • Food
    • Recipes
      • Appetizers
      • Breakfast
      • Casseroles
      • Crockpot
      • Desserts
      • Drinks
      • Main Dishes
      • Pasta
      • Salads
      • Sandwiches
      • Side Dishes
      • Snacks
      • Soups
      • Special Diet
        • Gluten Free
        • Paleo
        • Vegetarian
      • 5 Ingredients or Less
      • 30 Minutes or Less
    • Meal Plans
  • Holidays
    • Valentine’s Day
    • St. Patrick’s Day
    • Easter
    • July 4th
    • Halloween
    • Thanksgiving
    • New Year’s Eve
    • Christmas
  • Projects
    • Crafts
    • Decor
    • DIY
    • Pinworthy Projects
  • Work With Me
  • About
You are here: Home / Crafts / {Guest Post} Molded Owl Pendants

{Guest Post} Molded Owl Pendants

August 20, 2013 By Shannah Coe 4 Comments

Today’s guest blogger is Nancy from Small Things with Love. I am so excited to have her here today sharing a great tutorial with you on how to make molded owl pendants.
************************************************

Hello Just Us Four Readers!  I’m Nancy from Small Things with Love.  I am also a Just Us Four reader, and am honored today to be guest posting while Shannah is busy.  I just love this blog, and am thrilled to be contributing today.

But, before I get to the project, just a little bit about me.  I am a busy mommy to 2 kids, both still in diapers.  Before I became a mom I taught high school English, and over on my blog I enjoy writing about anything craft, family, faith-filled or beautiful.

Now, onto the project!  Today I will be sharing how to make these cute, molded clay owl pendants.  As you can see, I love color, and working with clay gives you lots of wonderful color options.

Here are the supplies that you will need:
Polymere Clay (I got mine from Wholeport)
Mold (I got mine from Martha Stewart)
Needle
Wire
Needle-Nosed Pliers, and Flat-Nosed Pliers. 

First, mold you owls (or whatever shape you choose).

Getting this mixed color effect is really easy.  Just grab small pieces of different colors, and press them into the mold.  Continue adding and pressing until the mold is full and the back is as flat and smooth as possible.

Then, after you have carefully removed the clay from the mold, take a needle and make a hole in the top.  Once this is done, bake in oven according to the package instruction.

After the owls are hardened and cooled, it is time to add a wire-wrapped loop to the top–to truly make it a pendant.  To do this, first cut piece of wire about a foot long (you will have extra), and put a small loop at the top.

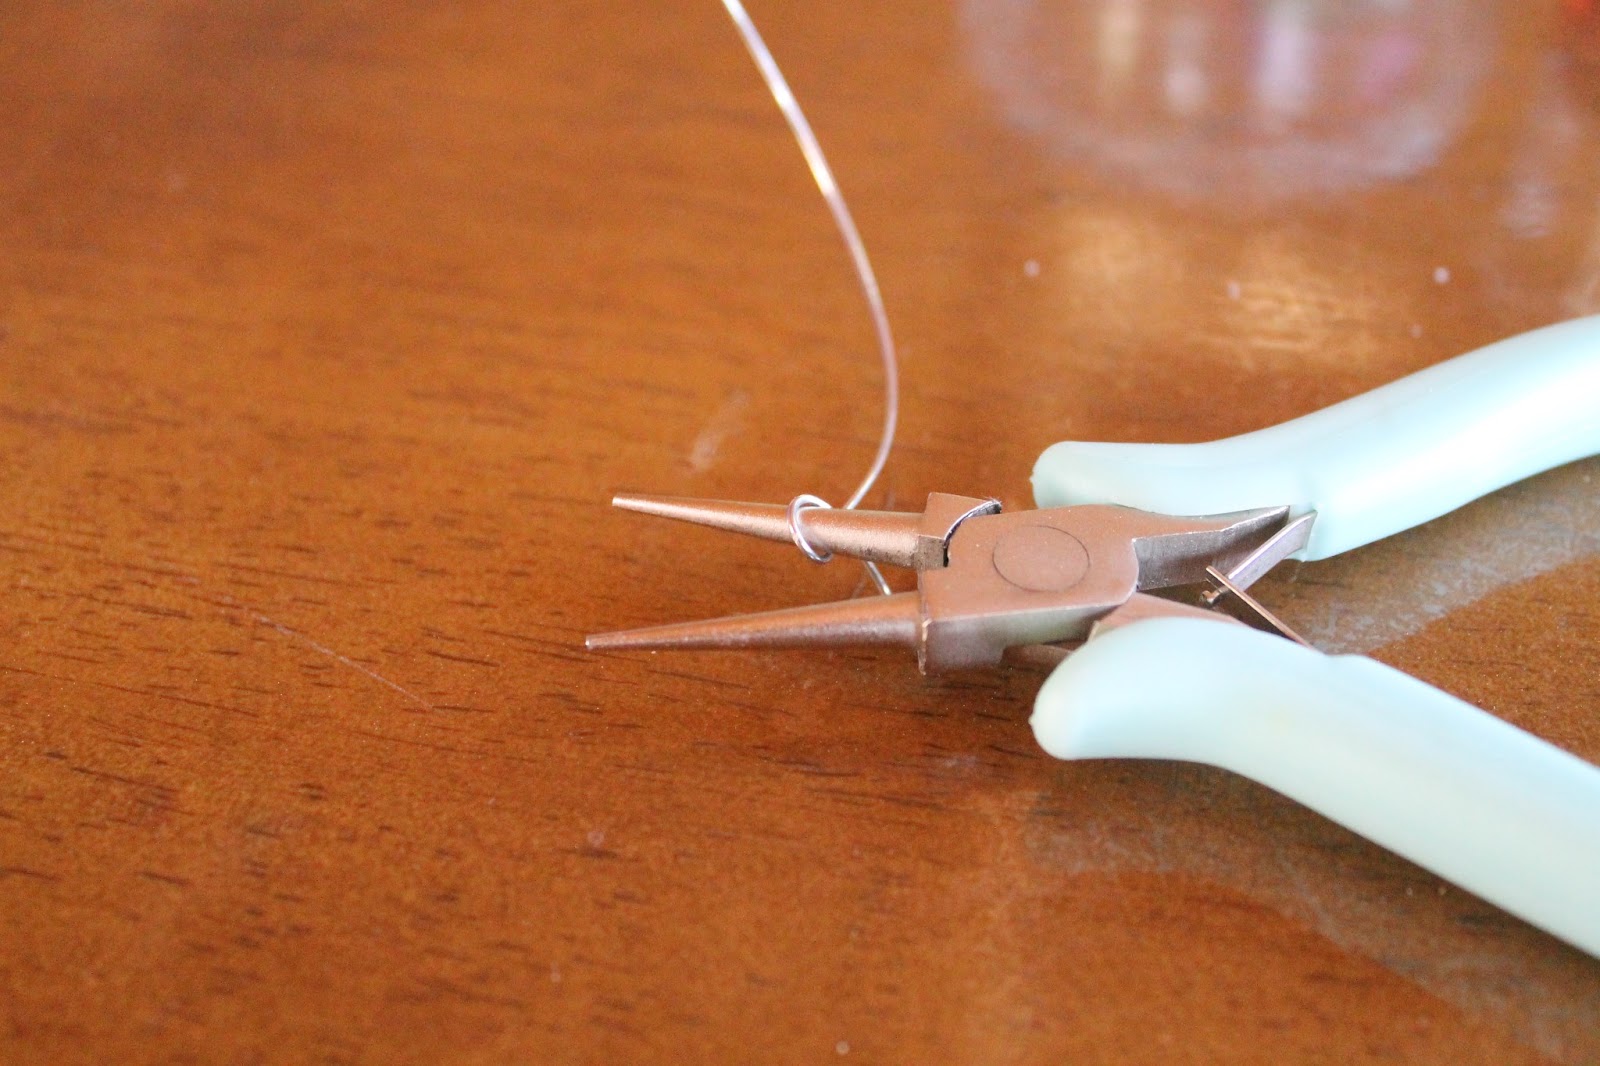
Wrap the short end of wire around the bottom of the loop.

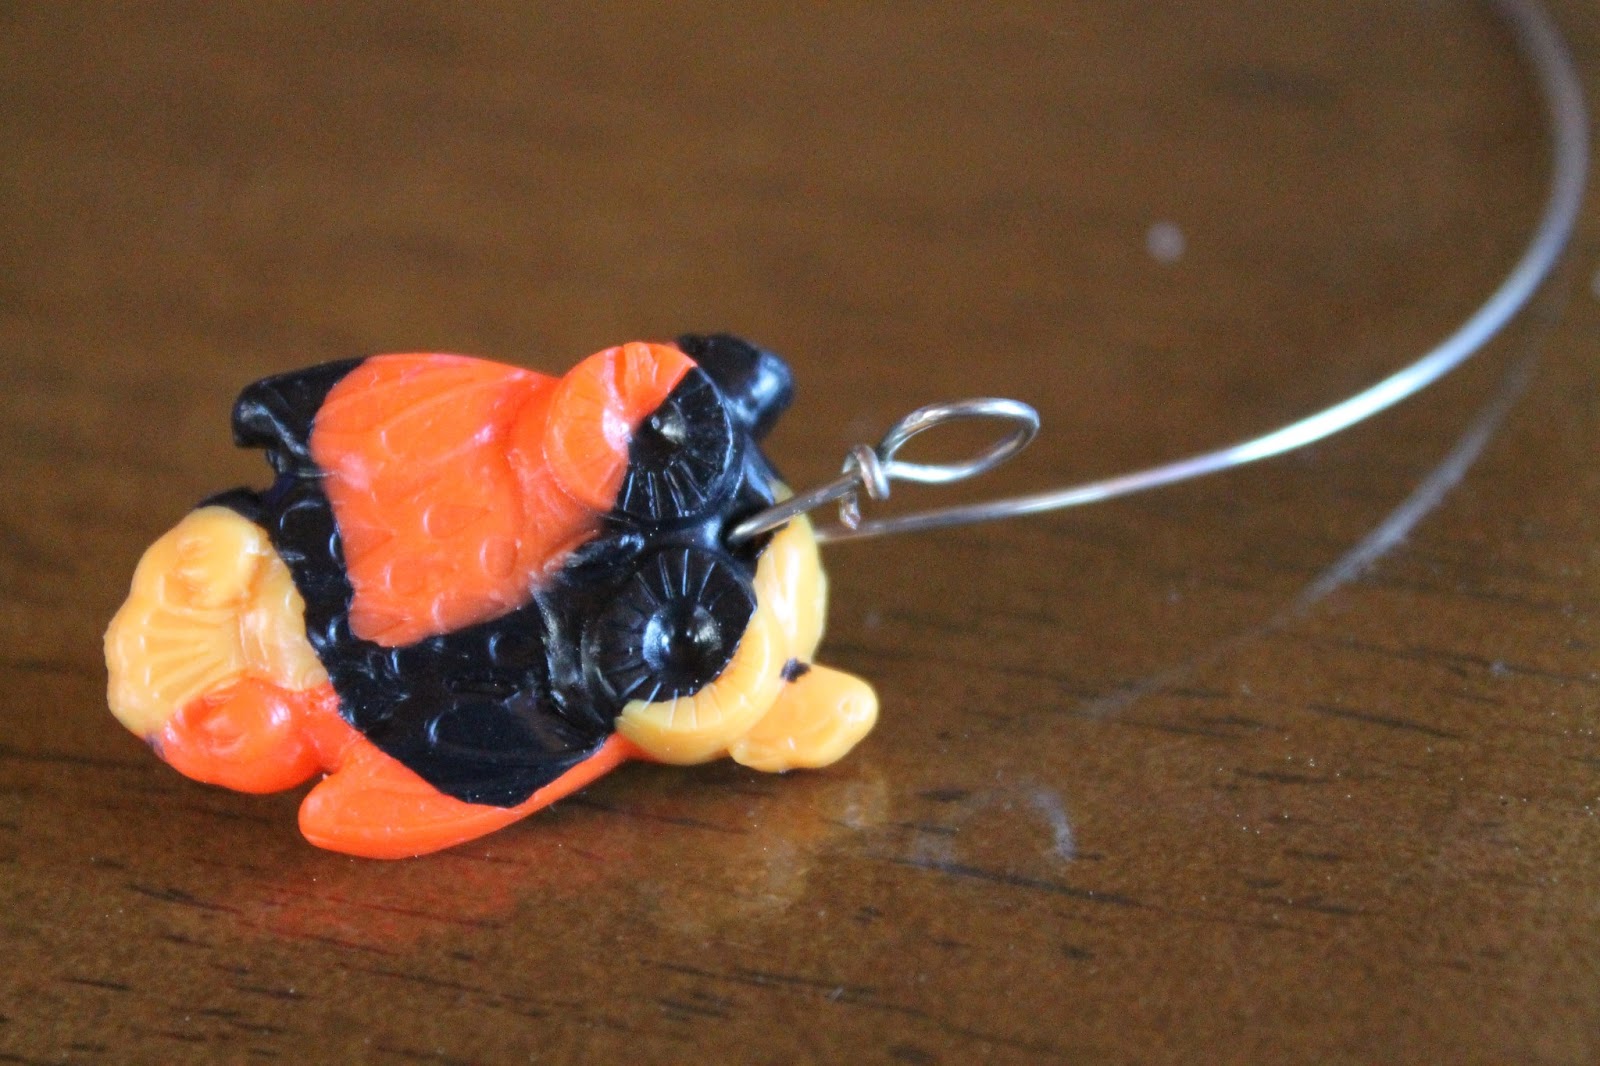
Thread the long end of wire through the owl, and bend the small end up.

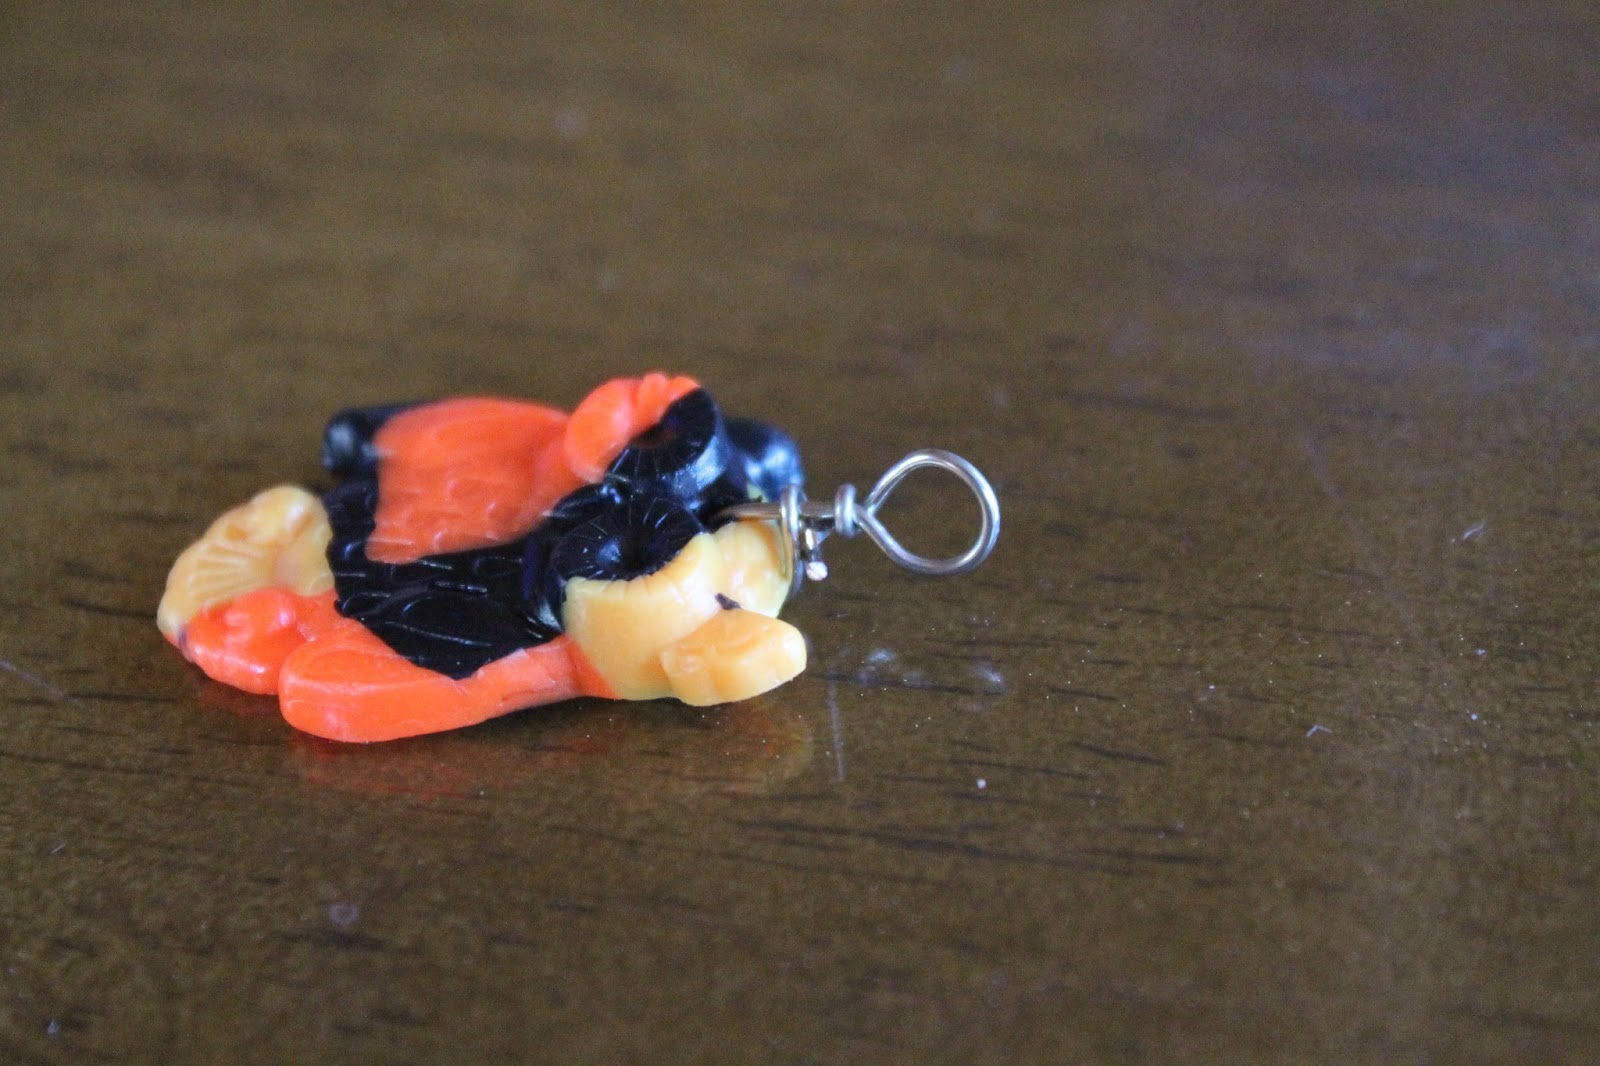
Finally, wrap the long end around the base of the loop a few times, trim and tuck in the rough end.

And….there you have it!  These are easy and fun to make.  Give it a shot!

If you do, I bet you can’t make just one…I certainly couldn’t!

I can’t decide which one I should wear first!!!

Thanks again to Shannah for having me.
I’d love to connect with you in some way!
*************************************************
Thanks so much Nancy!  Those owls are so cute! I can’t wait to give them a try.
sig

Filed Under: Crafts, Guest Posting Tagged With: DIY jewelry, Guest Posts, jewelry, molded crafts, owl pendants

« H’s Room Redo – Painted Paper Boxes
{Guest Post} Watermelon Lime Sorbet Pops »

Let's stay connected...

Never miss a recipe
Name: 
Your email address:*
Please wait...
Please enter all required fields Click to hide
Correct invalid entries Click to hide
No spam, ever. Promise. Powered by FeedBlitz

Never miss a recipe
Name: 
Your email address:*
Please wait...
Please enter all required fields Click to hide
Correct invalid entries Click to hide
No spam, ever. Promise. Powered by FeedBlitz


Comments

  1. Jessica Christian says

    August 21, 2013 at 5:02 am

    SOOOOO Cute!!!! I can’t stop staring at these and certainly can’t wait to be actually making it.
    Infinite Hearts for this one !!!
    Love it
    Hugss
    Jessica x
    Jessica Christian recently posted…Beautiful Bedding IdeasMy Profile

    Reply
    • Shannah Coe says

      August 21, 2013 at 9:14 am

      Aren’t they cute?! I love owl anything so I was definitely interested in trying these out when I saw her guest post.

      Reply
  2. BBquing says

    October 6, 2021 at 8:46 am

    Thanks for spreading this information, it’s very valuable.

    Reply
  3. Buyprobattery says

    October 6, 2021 at 8:52 am

    thanks for this information.

    Reply

Leave a Reply Cancel reply

Your email address will not be published. Required fields are marked *

Recipe Rating


CommentLuv badgeShow more posts

This site uses Akismet to reduce spam. Learn how your comment data is processed.

  • Bloglovin
  • Email
  • Facebook
  • Instagram
  • Pinterest
  • Twitter

About Me

Hi, I'm Shannah! Welcome to My Suburban Kitchen, where you'll find tons of recipe ideas including family friendly dinners, sinfully delicious desserts and even Paleo and Whole30 recipes. I love spending time in our kitchen and also share little glimpses of my life as a wife to one awesome Mathlete and working mom to 2 cute kids! I hope you'll grab a seat at our table and enjoy your time in the kitchen with us.

Search the Past

Visit Our Sponsors

Copyright © 2023 · My Suburban Kitchen