My Suburban Kitchen

Delicious Recipes to Keep my Family of Four Happy and Full

  • Home
  • Food
    • Recipes
      • Appetizers
      • Breakfast
      • Casseroles
      • Crockpot
      • Desserts
      • Drinks
      • Main Dishes
      • Pasta
      • Salads
      • Sandwiches
      • Side Dishes
      • Snacks
      • Soups
      • Special Diet
        • Gluten Free
        • Paleo
        • Vegetarian
      • 5 Ingredients or Less
      • 30 Minutes or Less
    • Meal Plans
  • Holidays
    • Valentine’s Day
    • St. Patrick’s Day
    • Easter
    • July 4th
    • Halloween
    • Thanksgiving
    • New Year’s Eve
    • Christmas
  • Projects
    • Crafts
    • Decor
    • DIY
    • Pinworthy Projects
  • Work With Me
  • About
You are here: Home / holidays / Christmas / The Paper Christmas Tree

The Paper Christmas Tree

December 14, 2011 By Shannah 4 Comments

I know, I know…you probably came here today with your grocery list in hand looking for recipes.  I’m taking a brief hiatus from WTCW (one week).  I’ve been prepping some guest posts and getting ready to co-host Crafty Scrappy Happy Me Thursday with my blogger friend, Jaime.
So, today, instead, I am bringing back a post from the past that I did for Emily over at Naptime is My Time.  I did a guest post for her and shared how to make a paper Christmas tree decoration with scrapbook paper and Styrofoam.

What will you need?

Scrapbook or other similar paper.  Double sided works best!
A styrofoam or paper mache tree.
Paper cutter or scissors
Straight pins

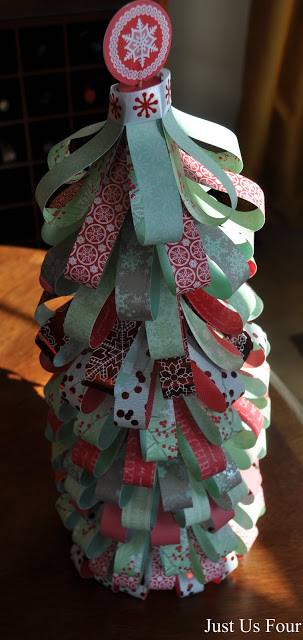
Ok, got all those things?  I figure most of you lovely ladies {or handsome guys} have a lot of those items in your everyday craft supplies!  The first step is to cut your paper into strips.  Using my {or my borrowed} paper cutter, I made mine all 3/4″ of an inch wide.

Now, take your styrofoam {or paper mache if that is what you chose} tree and get ready to pin the pieces on.  I simply folded mine, without creasing and then used the straight pins to attach them to the tree form.

Once you get a layer done, just do the next layer and move along up the tree form.  I used different paper for each of my layers.

Once I had all of the layers on the tree, I added a cupcake topper as my tree “star”.

I also wrapped the very top of the final layer with a piece of ribbon to cover up the little pins that showed.  It looks like one little pin just won’t go into hiding though…oops!

This little Christmas tree will probably live on my island in place of the current straw decorations.  I love how all the layers work together!

Have you made any unique items with scrapbook paper or styrofoam recently?  Those two supplies seem to be all the rage in decorating these days.

shannah


© 2012 Just Us Four.  ALL RIGHTS RESERVED.

sig

Filed Under: Christmas, Crafts, decorating, Guest Posting, holidays Tagged With: Christmas, Christmas crafts, Christmas Decorations, scrapbook paper art

« Shaking It Up
Our Christmas Home »

Let's stay connected...

Never miss a recipe
Name: 
Your email address:*
Please wait...
Please enter all required fields Click to hide
Correct invalid entries Click to hide
No spam, ever. Promise. Powered by FeedBlitz

Never miss a recipe
Name: 
Your email address:*
Please wait...
Please enter all required fields Click to hide
Correct invalid entries Click to hide
No spam, ever. Promise. Powered by FeedBlitz


Comments

  1. Craftberry Bush says

    December 17, 2011 at 3:18 am

    This is so pretty…I love the colours you chose…have a beautiful Christmas….ps. I’m your number 100…! congrats xo

    Reply
  2. Kristie says

    December 19, 2011 at 12:50 am

    This is great! I love the pretty papers you used. I pinned this so I can give it a try for next year.

    Reply
  3. Mindie Hilton says

    December 20, 2011 at 5:45 pm

    Featuring this week at Bacon Time, Happy holidays and hope your Christmas is magical.

    Reply

Trackbacks

  1. 10 DIY Christmas Tree Craft Ideas - The Kid's Fun Review says:
    December 17, 2013 at 8:00 am

    […] Paper Loop Christmas Tree via Just Us Four Blog~ I think this one is very elegant. Make three of these in different sizes for your holiday centerpiece! […]

    Reply

Leave a Reply Cancel reply

Your email address will not be published. Required fields are marked *

Recipe Rating


CommentLuv badgeShow more posts

This site uses Akismet to reduce spam. Learn how your comment data is processed.

  • Bloglovin
  • Email
  • Facebook
  • Instagram
  • Pinterest
  • Twitter

About Me

Hi, I'm Shannah! Welcome to My Suburban Kitchen, where you'll find tons of recipe ideas including family friendly dinners, sinfully delicious desserts and even Paleo and Whole30 recipes. I love spending time in our kitchen and also share little glimpses of my life as a wife to one awesome Mathlete and working mom to 2 cute kids! I hope you'll grab a seat at our table and enjoy your time in the kitchen with us.

Search the Past

Visit Our Sponsors

Copyright © 2023 · My Suburban Kitchen