I know you are all waiting anxiously for details about our vacation family trip and I promise to get them to you. I just have about a million pictures to sort through before I can give you all of the details…you don’t want to look at a million pictures of us right? Didn’t think so.
After days hours of unpacking, I needed a break. I went to pick up our mail from our wonderful neighbors and discovered my package from Chic Shelf Paper had come while we were away. Cue excitement! I practically ran out of their house to get home and start my little project. At least, I planned it to be a small project. If you remember that saying about best laid plans, you can already see where this is going…of course, the title probably gave it away a bit too.
Recently, I purchased this awesome white lacquer tray from West Elm with plans to paint the inside of it.
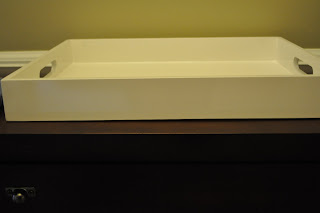
The more I thought about painting it, the more I disliked the idea. The tray resides in the front hallway on our entryway table. Given that it is the entrance to our house, the whole theme up there changes quite a bit (think holiday motifs, etc.) so picking a paint color seemed very daunting. Enter the idea to just line it with awesome shelf paper which is easily changed whenever I want!
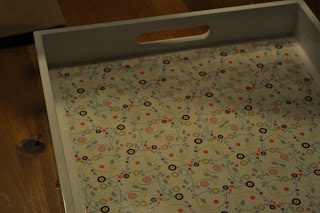
Enter: Chic Shelf Paper. I looked through their online catalog and ordered a few samples before settling on Gypsy Garden.

For this initial lining, I chose to have them pre-cut it for me so I could just place it in the tray. Now, I am sure you are expecting a pretty picture of my finished project but I will already warn you that the finished picture is pretty far away because I mis-measured (GASP!). I’ll give you a minute to catch your breath before I continue. Better?
I pulled my wonderful paper out of the package only to find I hadn’t taken into account the difference in size between the entire tray and the inside where the paper would be sitting. No problem…I have a paper cutter! Well, the paper was too big for my paper cutter so I decided to cut it by hand. In any normal situation, Mathlete Hubby would have already stepped in with a sanity check some assistance. This wasn’t a normal situation though because a) I was working in the front hallway and b) it was the weekend of the 24 hours of Le Mans (i.e. a weekend I don’t really have a husband). So, out came my scissors and my “steady” hand. What came next was a disaster and a cry for help!
Those of you that know me have often heard me complain a little about hubby’s racing hobby. My hobbies (cooking, shopping, etc.) benefit the entire household while racing typically only benefits him. That all changed last night…racing rescued me. (There…I said it in print…forever cached by Google!) In non-professional racing (I hate the word amateur because those guys do really know what they are doing!), the racers get sponsors just like in other sports. These sponsors, of course, want some recognition for their contribution and that comes in the way of the drivers putting stickers on the cars. Now, before you go picturing the car from Taladega Nights with even the windows covered in stickers, please know that it is pretty tame compared to some of the bigger motor sports.
Now, racing (and hubby) couldn’t 100% save my paper because I had already cut it too small to cover the entire bottom of my tray. However, we were able to square off the edges and then center it so it looked like I meant for it to be smaller than the bottom of my tray (we’ll keep our secret, right?).
First up was squaring off the paper to disguise my hack job less than perfect cutting. I had already peeled the shelf paper from its backing so we had to grab some handy freezer paper (wax paper or parchment paper would work too!) to stick the paper onto while we cut.

From there, we used a square and an exacto knife to make sure we had the edges perfect.


Once we had the edges right, it was time to put it back in the tray. The paper was smaller than the tray so I needed to be able to position it perfectly and then have it adhere to the tray. My Hubby’s secret weapon: a spray bottle.
We sprayed the back of the paper to get it just a little damp. This would allow us to put the paper down and move it into place before the adhesive set.
Once we had the paper in place, we used a very technical tool to go over the paper and push all of the excess water out to the edge so that we could soak it up…a Barnes & Noble kids club card.
With the water soaked up by paper towels (another very special tool of the trade), we put the tray in its proper place in the foyer to dry for 24 hours. It didn’t turn exactly like I planned but it looks pretty good in my book!
Oh, and I learned something from racing too!
© 2012 Just Us Four. ALL RIGHTS RESERVED.


Leave a Reply